Here is my Christmas block ... tutorial below...
We are going to be making a Santa block :) Go to this url to get your
Santa pattern:
Print it out and trace your Santa on iron on fusible web Pellon Wonder Under 805.
Pick out your background fabric ...
Pin your coloring book page to the fabric and use it as the guide to cut out your square...
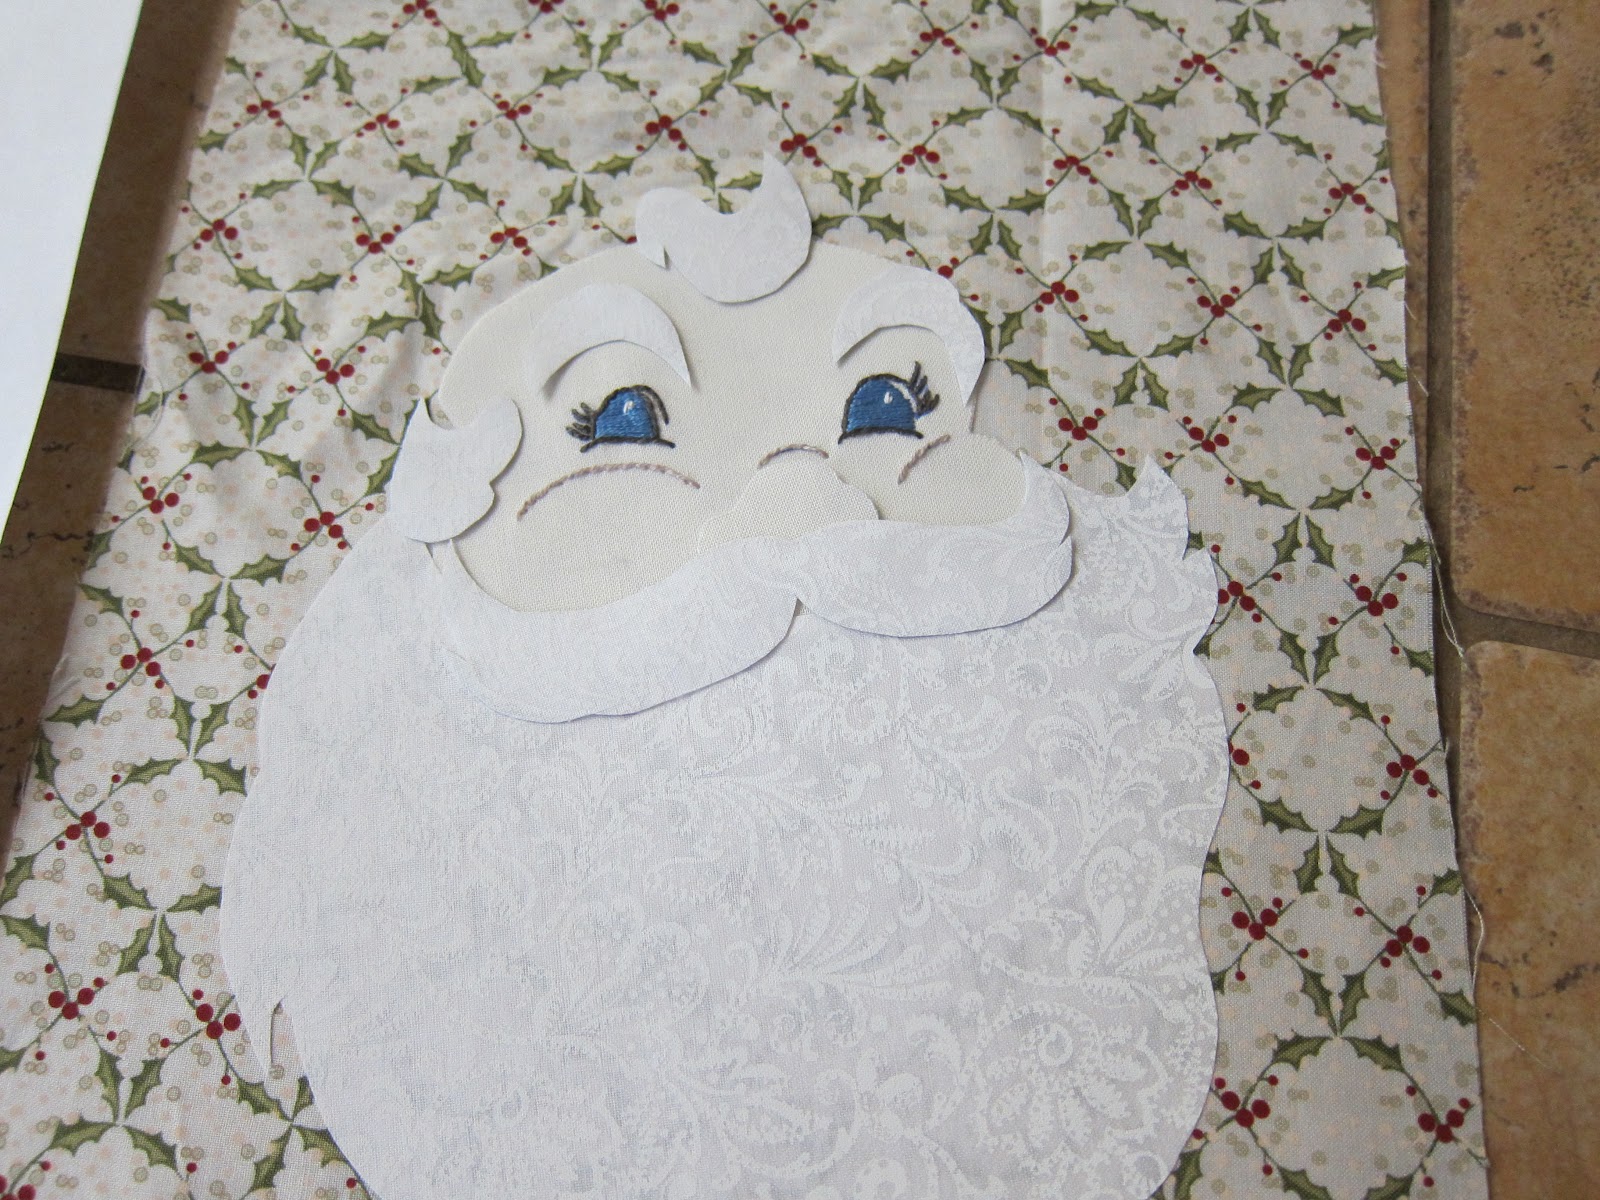
Now comes the fun part! Iron your fusible web to an off-white piece of fabric for Santa's face. I actually used two pieces of material for his face so you would not see my background fabric thru his face. Depending on how thick or dense your face fabric is, you may not need to do this.
I used a Pilot Fixion blue ink pen to draw Santa's features on his face to embroider later.
This pen is the 'bomb' - the ink removes instantly when you iron it. So easy to remove mistakes!
I used DMC embroidery thread 334 for Santa's eyes... Using a solid stitch ... embroider Santa's eyes.
Now we will use DMC 884 for the outlining of Santa's eye lashes ... I used 2 strands throughout...
I found a lighter gray in my stash (no longer have the color number) to finish his cheeks and start his nose. I also added a couple of stitches of white to his eyes to give Santa his 'Sparkle'.
Lets now iron on his beard (being sure to overlap a tiny bit on his lower face) Then position his eyebrows, mustache, and hair on without ironing them on yet - just to get the feel of how Santa is going to look.
Now you have the right position of his facial hair - you can put his stocking cap under his hair...
Lets not forget the top of his stocking cap... position it on also, being sure to put his ball under the cap.
Remove all his facial hair and iron on the hat and cap and ball :)
I now started blanket stitching around his beard in DMC 3024.
If you prefer to use a different color - go for it. I wanted my beard to stand out a bit more than his cap so I used a really light gray. When I blanket stitched his beard, I used a bit of a
chain stitch to accent it.
Finish embroidering his nose, lips and beard... I used a rosey pink for his lips from my stash...
A close up of Santa's detail in his beard and lips...
Starting to look like a Santa!!! Now embroidery his cap with white...
Use DMC red 610 for his stocking cap...
DMC 3024 (or whatever shade you used for his beard) for his facial hair...
I added one inch strips for the border. I also used crayon and painted on some 'rosey' cheeks for Santa
This you tube video will show you how to apply cheeks to Santa with color crayons.
I hope you have as much fun making Santa as I did... Now I have to run and check out everyone else's Christmas blocks... Enjoy!
Thank you Lesley for having this fun
block hop :)
Be sure to visit the other Christmas bloggers...
Quilting Fiesta
Scrapbox Quilts
From This to That
Buzzing and Bumbling
No Loose Threads
Deborah B
Judith Handmade Treasures
Gran-Knot-Y Embroidery Lady
Mrs. Pickles
Susie's World


Oh my gosh! This Santa is absolutely gorgeous! You have made my heart soar! Your tutorial is perfection...I definitely plan on making this guy...I only hope my embroidery will be a smidgen as good as yours! Santa's eyes are perfection...they really sparkle! Thank you sooooo much for participating and sharing the tutorial. This is just so awesome!
ReplyDeleteFabulous! and what a great idea to use a colouring page for your applique!
ReplyDeleteThank you so much for sharing today. Your project is fabulous!
ReplyDeleteYour Santa is very cute. It would make a great top to a countdown calendar.
ReplyDeleteGood Morning Bonny, the detail and your fine thread stitching is gorgeous...well done...
ReplyDeleteMay I ask that you add the rest of your ladies to your blog post can be found on sewwequilt.com or at Lesley's lesleythecuddlequilter.com
Nobody will know to go from your blog to the next..thanks...
Merry Christmas Bonny. Thank you for your wonderful appliqued and embroidered Santa. His eyes twinkle, his mouth smiles, his beard is so curly matching the fabric. What a jolly Santa - thank you for the tut.
ReplyDeleteA Happy Santa that makes you smile just to look at him. Thank you for the great tutorial and the you tube link. Merry Christmas.
ReplyDeleteWow its fabulous - great tutorial too! Thanks for sharing.
ReplyDeleteGreat block, I love the rosy cheeks! Thanks for sharing.
ReplyDeleteOH this is a wonderful block...I collect all kinds of Santa's and I have already printed him out. Thanks again for your tutorial and happy holidays to you.
ReplyDeleteyour santa is amazing. love the way you stitch the eyes and well found everything beautiful. You tease me i now follow your blog on bloglovin! have a nice blog hop and hope to see you on my blog on sunday, have a giveaway too!
ReplyDeleteNice job, love the tut! Santa looks great in applique and embroidery! So good to hop with you.
ReplyDeleteHow fun to see Santa come to life! What a great job you've done. Thanks for the tutorial.
ReplyDeleteWhat a precious Santa! Thanks for putting together a tutorial for us - I think this will be one of those I can't wait to do. :) blessings, marlene
ReplyDeleteWonderful tutorial! I might be able to do this!
ReplyDeleteOh you did a lot of work in this one block! Wonder tutorial - love all the handwork to make Santa come alive - thank you for sharing with us today.
ReplyDeleteWhat a cute little Santa face. I love his brilliant blue eyes and his rosy little cheeks. I use the Frixion pens also and love them. I do have a hard time finding them in the stores.
ReplyDeleteThanks for posting.
What a good idea and a great tutorial. There are lots of copyright free line drawing art on the internet on a variety of topics. One could make dozens of quilts!
ReplyDeleteBonny, this is a sweet block. Thanks for the tutorial on how to make it - you did a great job on the block and the tut!
ReplyDeleteI really like him and you did a great job on the tutorial. Takes a lot of time to put one of those together.
ReplyDeleteVery cute! You did such a nice job on it too.
ReplyDeleteCute Santa! Thanks for the tutorial!
ReplyDeleteThank you for a great tutorial, Bonny! Your Santa looks beautiful!!!
ReplyDeleteYour Santa is such fun, thank you for showing him to us.
ReplyDeleteHow cute is this?!?!!!
ReplyDeleteYour embroidery is perfect... love the eyes! You've captured his twinkle!
Thanks for hopping along with us... Happy Hopidays!
I'm a new follower.
That is so cool! I love it!
ReplyDeleteGreat Santa and thans for the tutorial.I am amazed at all the ideas we are getting.Love your block
ReplyDeleteAsses....Santa is adorable! Thanks for sharing.
ReplyDeleteOh my gosh! That is amazing!! I knew I loved coloring books but now even more! Thank you for the great tutorial.
ReplyDeleteLove your Santa is so lovely.Thanks for the tutorial!!
ReplyDeleteThanks for the great tutorial!
ReplyDeleteWhat a fun block...thanks for the tutorial!
ReplyDeletesuch a smart idea! I just love your block. so cute. thanks for sharing the steps with us.
ReplyDeleteWOW what a great looking Santa!
ReplyDeleteWhat a precious block! Thank you for sharing the tutorial!
ReplyDeleteYour Santa block is adorable! Thank you for the wonderful tutorial. Happy quilting!
ReplyDeleteYou've given Santa a great compliment. He's marvelous. =)
ReplyDeletewhat a cute Santa!!! thanks for sharing!!
ReplyDeleteBeautiful handstitching on a handsome Santa! Outstanding and great tutorial to follow. Thank you for sharing....Judith, Texas
ReplyDeleteWhat a good idea to use a colouring page for the applique pattern. Your stitching is very well done. Thanks for sharing how you did it.
ReplyDeleteThat is one perfect Santa, I love it, thanks so much for sharing. Now I can try to make one similar.
ReplyDeleteSanta with the blue eyes. I love it. aurea.gillis@gmail.com
ReplyDeleteGreat tutorial and I love that Santa! Thanks for joining in the hop. :O)
ReplyDeleteYour banner photo is darling and your santa perfect for Ho, Ho, Ho-ing!! Thanks for the great tutorial and ideas! Happy Hopping!
ReplyDeleteThis is way too cute! I love it.
ReplyDeleteCute Santa!
ReplyDeleteWhat a great Santa and a wonderful tutorial.
ReplyDeletecool. thank you for sharing. hugs
ReplyDeleteLovely embroidery, terrific tut.
ReplyDeleteHe is charming! Thanks for sharing.
What a darling block! Great job on your tutorial as well. Thanks for sharing Santa with us.
ReplyDeleteI love coloring pages for quilt blocks. There are many online too. Great idea and wonderful block!
ReplyDeleteCute Santa - like the embroidery
ReplyDeleteI love Santa! Thanks for sharing the steps.
ReplyDeleteI just love your Santa block!! It is gorgeous!! Thanks for the tutorial!!
ReplyDeleteGreat Santa block. Thanks for the tut.
ReplyDeletecute Santa block!
ReplyDeleteSweeeeeeeeeeeeeet! I love him!!!
ReplyDeletexx
This is a great block and super tut. It is amazing how he comes to life as you move down the blog. Thanks for hopping.
ReplyDeleteLoved your Santa Face!! Great tutorial!!
ReplyDeleteyou made it look so quick and easy when I know the opposite is true--I can only imagine how much time this took to make! But it was worth every second--it's one-of-a-kind super cute!
ReplyDeleteGreat Santa block! Thanks for the tutorial.
ReplyDeleteI want one !! LOVE this can't wait to start
ReplyDeleteThis is going in my to-do list!
ReplyDeleteWonderful SANTA , Such a sweet expression on his jolly face.Thanks for sharing .
ReplyDeleteYou have created a very cute Santa- I love the background fabric- just a perfect backdrop for your Santa. Thanks for participating in the blog hop.
ReplyDeleteRegards from Western Canada,
Anna
You did an awesome job of doing the blanket stitch around the edges! Love the total effect you gave your Santa! He almost feels real. Thanks for sharing.
ReplyDeleteWhat a great Santa block - love the details! Howdy from Texas!
ReplyDeleteI love your santa block also the picture of your little sewer on you header is very cute
ReplyDeleteHELLO! A GREAT TUTORIAL+I LOVE YOUR SANTA!
ReplyDeleteTHANKS FOR SHARING!
msstitcher1948@yahoo.com
Thanks for sharing the Santa tutorial. You make it look easy.
ReplyDeleteGreat tutorial! thanks for the help on how to make this cute block!
ReplyDeleteLove your santa
ReplyDeleteYour Santa block is just the jolliest...too cute!! Thanks for sharing in the blog hop...happy stitching!!
ReplyDeleteI love your comment about your shampoo! I use coloring pages also because I am drawing challenged! LOL Thanks for sharing
ReplyDeleteI am totally in LOVE with this block!
ReplyDeleteI just keep coming back & looking at it ...